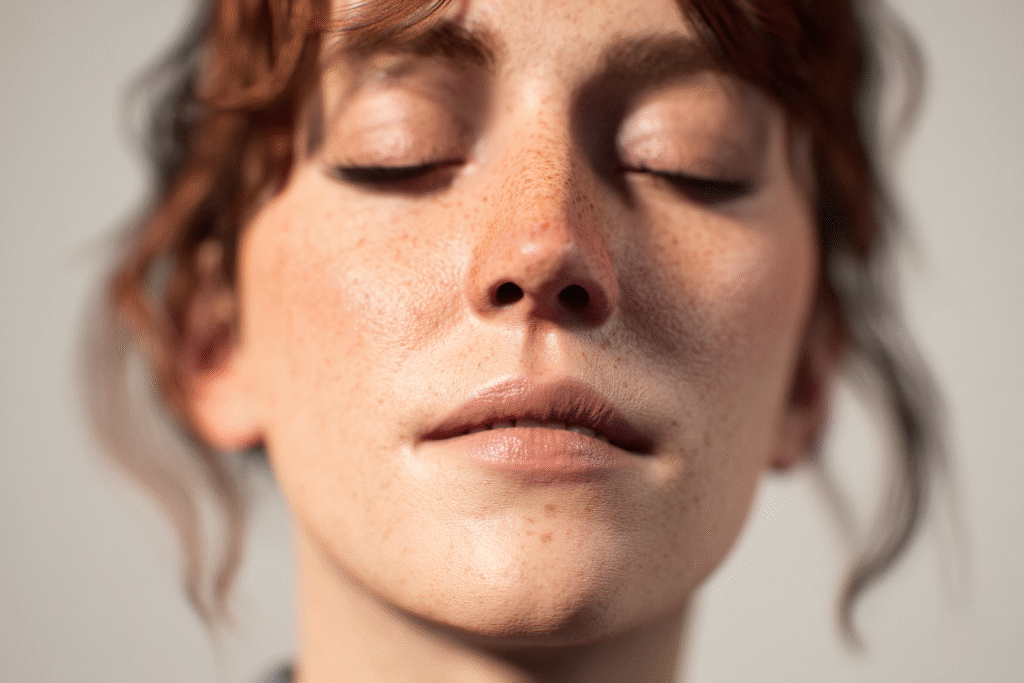
Goal: produce a photographic, realistic portrait of a person with natural lighting and believable shadows (not “plastic” or overly stylized).
Pro tip: think like a photographer — describe the light, lens, distance, emotion, and texture. The AI follows photographic cues best.
1) Plan your shot (prepare before you create)
- Decide subject details: age range, gender, ethnicity, hair color, expression, clothing style. Example: “early 30s, female, South Asian, relaxed expression, soft smile, natural makeup.”
- Decide lighting mood: golden hour window light, soft overcast, Rembrandt (side lighting with triangle of light), cinematic three-point lighting.
- Choose camera look: focal length (85mm for portrait compression), aperture (f/1.8 for shallow depth of field), filmic or digital sensor, ISO low for clean skin.
- Gather reference images for: face shapes you like, lighting examples, skin texture closeups, wardrobe, and poses.
2) Create a moodboard / upload references
- In the Midjourney interface, open the image creation page and find Add reference / Upload.
- Upload 4–6 reference images: one or two faces with the expression/face angles you like, one lighting example (e.g., window light on the face), one skin texture closeup, one wardrobe/pose reference.
- Name each reference briefly if possible (e.g., “window_light”, “85mm_portrait”, “skin_texture”).
How to use references in your prompt: either attach them in the UI then paste the prompt, or include their short code/position (if the UI shows ref IDs). Example intro in prompt area:[ref1] [ref2] [ref3] — prompt text here...
(If your interface doesn’t show IDs, just upload refs and then write the prompt — the system will combine them.)
3) Build the core prompt (structure)
Use this structure for the best control:
- Subject definition — who is it? (age, gender, ethnicity, clothing)
- Photographic cues — lens, aperture, focal length, perspective (headshot/3/4/full body)
- Lighting description — type, direction, quality (soft/hard), time of day
- Skin and texture details — realistic pores, natural skin tones, subtle freckles, no plastic skin
- Stylistic modifiers — film stock, color grading, subtle grain, natural color palette
- Negative prompts — words to avoid (e.g., “no plastic skin, no unrealistic gloss, no cartoonish”)
- Parameters — aspect ratio and Midjourney flags
Example core prompt (ready to paste):
Portrait of a South Asian woman in her early 30s, relaxed gentle smile, natural makeup, medium-length dark hair tucked behind ear, wearing a soft cream sweater — shot as a tight head-and-shoulders portrait, 85mm lens look, shallow depth of field, f/1.8, natural window light from the left, soft shadows, subtle rim light from back, cinematic filmic color grade, realistic skin texture with visible pores and soft freckles, detailed eyes, catchlight, slight film grain, ultra photorealistic — no plastic skin, no oversaturated colors, no heavy retouch, no caricature. --ar 2:3 --v 6 --q 2 --stylize 50 --seed 12345
Adjust
--v(version),--q(quality 1–2),--stylize(lower for realism),--arto 2:3 for portrait, and--seedfor reproducible results.
4) Choose exact Midjourney parameters (suggested)
Use these when you want a photographic outcome:
--ar 2:3→ classic portrait aspect (replace with--ar 3:4or--ar 4:5as needed)--v 6→ (or the latest model your interface uses)--q 2→ higher quality (2) for final images (costs more)--stylize 20–60→ lower stylize = more photorealistic (try 30–50)--seed 12345→ optional for reproducible results--uplightor--upbeta→ softer upscaler (if available)--no plastic skin, --no cartoon→ negative tokens (if supported)
Example parameter string: --ar 2:3 --v 6 --q 2 --stylize 40 --seed 8421 --upbeta
5) Personalization & small details that make it real
Add any of these to the prompt to avoid “plastic” look and boost realism:
- “subtle skin pores and fine facial hair”
- “natural skin undertones, slight imperfections like faint freckles or fine lines”
- “soft realistic specular highlights (not glossy)”
- “accurate iris detail, tiny blood vessels, natural tear reflection”
- “shirt fabric visible weave detail”
- “ambient occlusion in shadow areas for depth”
- “slight film grain, gentle highlight roll-off”
Example insertion: realistic skin pores, subtle freckles, natural skin undertone, soft specular highlights, ambient occlusion in deep shadows
6) Where to place each reference (practical)
- Reference 1 (face angle/expression): Use for pose and expression. Put it first.
- Reference 2 (lighting): Use to guide light direction & quality (e.g., window left soft).
- Reference 3 (skin texture close-up): Use for texture cues (“match skin texture like ref3”).
- Reference 4 (clothing/wardrobe): Use for style and color palette.
Prompt example with references (textual):
Use ref1 for face direction and expression, ref2 for left window lighting, ref3 for skin texture and pores, ref4 for wardrobe color and fabric — portrait of ... --ar 2:3 --v 6 --q 2 --stylize 40
7) Run a small test grid first
- Generate a 4-image grid first (lower cost) to pick the closest result.
- Choose the best image and upscale or reroll variations with similar seeds.
- If something is off (too smooth, weird lighting), tweak negative tokens and lower
--stylize.
8) Upscale and refine
- Use the soft upscaler if you want to keep natural skin.
- Use face refine options (if available) to keep proportions realistic but avoid over-retouch.
- Consider running a second prompt that focuses on eyes or skin detail only, then composite externally in an editor (optional).
9) Post-processing tips (small edits to polish)
- Exposure/Contrast: nudge exposure and contrast slightly; avoid extremes.
- Skin micro-contrast: apply subtle micro-contrast to bring out pores.
- Color grading: slight warm tone for natural skin (color balance +20 red, -5 blue).
- Sharpen eyes & lashes: selectively increase clarity on the eyes.
- Noise/grain: add slight film grain if AI smoothed too much.
- Frequency separation? Only if you know retouching — avoid overdoing.
Recommended tools: Lightroom, Photoshop, Affinity Photo, or any basic editor that supports selective adjustments.
10) Save your prompt, seed, and references
- Keep a small log: prompt text,
--seed, selected image number, and which references were used. This helps you reproduce or iterate.
Troubleshooting quick fixes
- Too glossy/plastic skin: add
--no plastic skin, lower--stylizeto 10–30, add “soft specular highlights, not glossy”. - Harsh shadows or blown highlights: change lighting prompt to “soft window light, diffused” and add “gentle highlight roll-off.”
- Unnatural eyes: add “sharp iris detail, natural catchlight, avoid anime eyes.”
- Weird teeth or hands: for portraits, avoid showing hands/teeth; add
--no wrong hands, --no distorted teethnegative terms.
Example complete final prompt (copy/paste ready)
[ref1] [ref2] [ref3] [ref4] — Portrait of a South Asian woman in her early 30s, relaxed gentle smile, natural makeup, medium-length dark hair tucked behind ear, wearing a soft cream sweater — tight head-and-shoulders portrait, 85mm lens look, shallow depth of field, f/1.8, natural diffused window light from the left, soft ambient fill from right, subtle back rim light, cinematic film color grade, realistic skin pores and texture, slight freckles, natural skin undertone, visible eyelash detail, crisp catchlight in eyes, natural shadow falloff, slight film grain for texture — no plastic skin, no oversaturated colors, no cartoonish details, no distorted hands --ar 2:3 --v 6 --q 2 --stylize 40 --seed 8421 --upbeta
10 screenshot captions (ready to paste under each screenshot)
- “Step 1 — Upload 4 reference images: face, lighting, skin texture, wardrobe.”
- “Step 2 — Set subject and expression: concise description for the portrait.”
- “Step 3 — Add photographic cues: 85mm lens, f/1.8, tight headshot.”
- “Step 4 — Define lighting: natural diffused window light from the left.”
- “Step 5 — Include skin detail: realistic pores, subtle freckles, soft highlights.”
- “Step 6 — Add negative cues: ‘no plastic skin, no cartoonish details’.”
- “Step 7 — Use parameters: –ar 2:3 –v 6 –q 2 –stylize 40 –seed 8421.”
- “Step 8 — Generate a 4-image grid and pick the best result for upscale.”
- “Step 9 — Upscale gently and use face refine/upscaler if available.”
- “Step 10 — Final polish: gentle color grade, sharpen eyes, add slight film grain.”
10 ready-to-use prompts (optimized for various outputs)
Notes on parameters: adjust
--v,--q, and--stylizeto your own Midjourney model/version.--ar(aspect) and--seedare included but optional.
1) Fantasy book cover (vertical)
Epic fantasy book cover: lone warrior standing on a misty cliff overlooking distant castles, dramatic stormy sky, cinematic lighting, painterly realism, rich textures, intricate armor details, atmospheric depth, bold title space at top --ar 2:3 --v 6 --q 2 --stylize 1000 --seed 3301
2) YouTube thumbnail (dynamic, punchy)
Bold YouTube thumbnail: smiling host pointing at big text "5 AI Hacks", high contrast studio lighting, colorful background, simple icons, ultra clear facial expression, large readable text area, 1280x720 composition --ar 16:9 --v 6 --q 2 --stylize 300 --seed 5512
3) Product mockup (clean)
Product mockup: sleek matte black wireless earbuds on clean white table, soft natural window light, subtle reflections, 45-degree camera angle, highly realistic materials and shadows, brand logo placeholder on case --ar 16:9 --v 6 --q 2 --stylize 60 --seed 7788
4) Character portrait (photorealistic human)
Headshot portrait of a woman, early 30s, South Asian, natural makeup, soft cream sweater, 85mm lens look, f/1.8 shallow depth of field, diffused window light from left, realistic skin texture, subtle freckles, catchlight in eyes, cinematic film grade — no plastic skin --ar 2:3 --v 6 --q 2 --stylize 40 --seed 8421
5) UI mockup (dashboard)
Dashboard UI mockup for productivity app, clean minimal layout, soft shadows, clear typography, 3 column layout, sample charts and task list, modern neumorphism touches, export-ready mockup --ar 16:9 --v 6 --q 2 --stylize 80 --seed 9922
6) Fantasy book cover — character close-up
Fantasy cover close-up: mage with glowing sigil, intricate face paint, dramatic rim lighting, dust particles in air, painterly photorealism, deep color palette, textured brushwork --ar 2:3 --v 6 --q 2 --stylize 1200 --seed 4400
7) YouTube thumbnail — product review
YouTube thumbnail: excited reviewer holding a gadget close to camera, blurred background, bold overlay text area, high contrast, clean lighting, wide-angle lens look --ar 16:9 --v 6 --q 2 --stylize 200 --seed 2211
8) Product mockup — lifestyle
Lifestyle product mockup: smart speaker on wooden kitchen counter, morning light, shallow depth of field, realistic reflections, subtle human hand reaching for product, cozy warm color grade --ar 3:2 --v 6 --q 2 --stylize 60 --seed 6633
9) Character portrait — stylized for game art
Game character portrait: cyberpunk rogue, moody neon rim light, textured leather jacket, cinematic shallow focus, high detail face scars and tattoos, epic mood --ar 2:3 --v 6 --q 2 --stylize 500 --seed 7077
10) UI mockup — mobile onboarding
Mobile onboarding screen mockup, 3 screens side-by-side, pastel color palette, rounded components, clear CTA buttons, optimized spacing and readable typography, export-ready --ar 16:9 --v 6 --q 2 --stylize 80 --seed 3344
Final notes & best practices
- Start less stylized for realism (low
--stylize) and increase only if you want a more artistic result. - Use real photographic cues (lens, f-stop, ISO) — Midjourney follows those very well.
- Keep a prompt log with seeds and reference IDs for reproducibility.
- If you plan to use the portrait commercially, avoid generating a real person’s exact likeness and check the platform’s TOS for commercial use.